|
||||||||||||||
|
Adding lightening holes to regions
|
||||||||||||||
|
||||||||||||||
|
||||||||||||||
|
Adding lightening holes to regions
|
||||||||||||||
|
||||||||||||||
How to add lightening holes to regions
The add lightening holes to region function lets you to add lightening holes of different types to a region.
 Add lightening holes
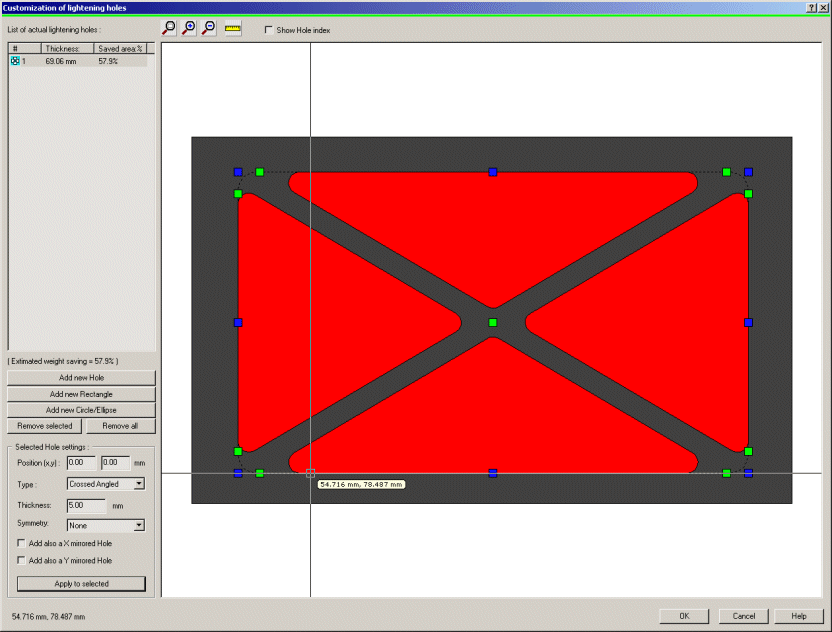
This dialog will appear:

In the left side of the dialog you can see the list of the applied holes and the buttons to Add and Remove them.
When a hole is selected in the list, you can see its
parameters just below the list. You can modify them and press the 'Apply to
selected' button.
You can drag use the control points on the graphic window to move the
holes and change its size and shape. Dragging the central green point the hole
will be moved. Dragging the blue control points you can change the shape and
size, moving a side or a vertex point. Dragging the other green control points
you can modify the rounding of each corner, for lightening holes only. When the
dragging operation is finished the right final shape of the hole will be
computed and rendered.
Each type of hole/slot can have different parameters:
Lightening holes parameters:
The Position fields specify the coordinates of the center of
the item
The Type can control the way you can leave material inside the hole:
You can also force the Simmetry the hole must keep, using the Simmetry combo box
Double clicking an item in the list to change the Type. The
Type is also displayed in the list as an icon.
The thickness parameter specify the thickness of the inside material
Applying some types can create more holes, depending on the shape of the
outer contour.
All the inside corners will be smoothed when possible.
Rectangle parameters:
The Position fields specify the coordinates of the center of
the item.
You can also specify the Width, the Height and the rotation angle of the
Rectangle
Circle/ellipse parameters:
The Position fields specify the coordinates of the center of
the item.
You can also specify the X and Y diameter (if the value is the same a
circle will be applied) and the rotation angle
If you Add a new item, it will be placed in the drawing. Using the control points you can then move it to the right position and shape/size it.
For some parts type (like Formers) you can also see two more check buttons:
Enabling them you can create mirrored copies of the selected hole/slot
Setting the Check to the 'Show hole index' button, the
index will be displayed in the centre of the hole, so that you can find it
easily in the list.
Just below the list you can read the percentage of saved weight.
Press OK to apply the settings, or Cancel to exit ignoring the modification
Note:
 Toolbar button. You will be prompted to click the 2 points to measure
 Toolbar buttons or in a faster way by the Scroll wheel of the
mouse
 Command
line: REGION_ADD_LH