|
||||||||||||||
|
Adjusting
the Grid and Grid Snap
|
||||||||||||||
|
||||||||||||||
|
||||||||||||||
|
Adjusting
the Grid and Grid Snap
|
||||||||||||||
|
||||||||||||||
To enhance drawing speed and efficiency, it is possible to display and snap to a rectangular pattern of grid points, controlling as well its spacing, angle, and alignment.
The grid is a rectangular pattern of dots that extends over the drawing area. Using the grid is similar to placing a sheet of grid paper under a drawing. The grid helps to align various objects and visualize the distances between them. The grid is not plotted.
The Snap mode restricts the movement of the crosshairs to intervals to be defined by the user. When the Snap mode is on, the cursor seems to adhere, or "snap," to an invisible rectangular grid. The Snap is useful for specifying precise points with the arrow keys or the pointing device.
While working, It is possible to turn the Grid and Snap mode on and off and also to change the grid and snap spacing. You can turn the Snap mode on and off temporarily by using an override key.
To draw along a specific alignment or angle, it is possible to change the snap angle. This rotation realigns the crosshairs on the screen to match the new angle. In the following example, the snap angle is adjusted to match the angle of the anchor bracket.
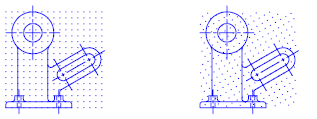
When the snap angle is set, the grid rotation also changes.
The snap base point is the offset from a specified X,Y value from which the snap points are measured. The default snap base point is 0,0, but it can be changed to any X,Y coordinate value to adjust snap points.
For example, if X and Y spacing are set to 0.5, and X and Y base points are set to 0,0, the snap points along the X and Y axes are 0, 0.50, 1.0, and so on. Changing the X snap base point to 0.1 and the Y snap base point to 0.2 causes the snap points along the X axis to shift to 0.1, 0.60, 1.1, and so on, and the snap points along the Y axis to shift to 0.2, 0.7, 1.2, and so on.


