|
||||
|
3D Part management
|
||||
|
||||
|
3D Part management
|
||||
3D Part management Pro version only
Using this dialog you can modify and preview a 3D Part.
See 'not Tapered parts
and Tapered parts'
to better undertstand what Tapered parts are.
You can have access to this dialog by the 'Modify the selected 3D Part' button of the 'Browse Tapered Parts' dialog, or by creating a new 3D Part by the 'Tapered Parts - Create a new 3D Part' menu of a Cad drawing. Se also How to create a new 3D Part to understand how to proceed to create new Tapered Parts.
Here is an example of the dialog box, if you go to modify an existent 3D part :
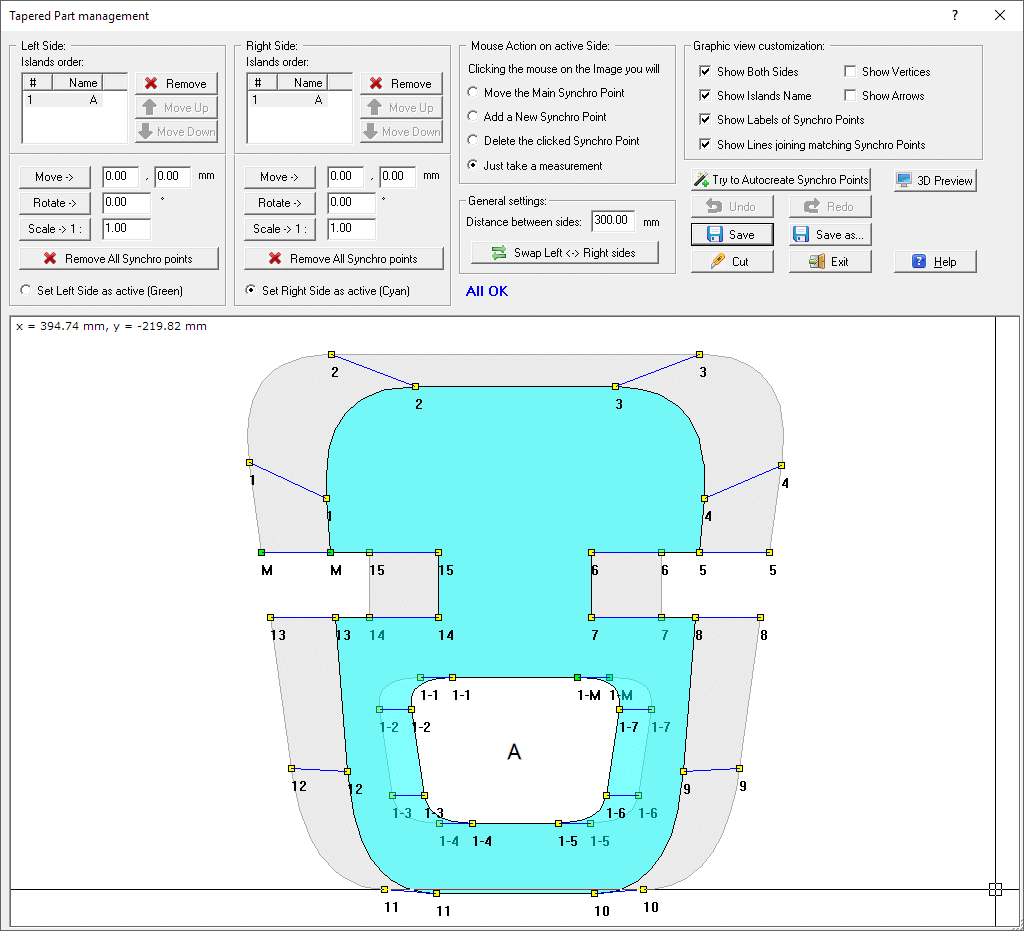
A 3D part is defined by 2
sides (Left and Right), placed at a defined distance along the Z axe.
On the Left of the dialog you can see 2 panels, one for the Left side and one
for the Right side.
You can Move, Rotate and Scale each Side using the buttons and parameters there
included.
Once you have sized and
placed the two sides (Faces), you must take care of Island orders (if you have
2 or more Islands) and of Syncro Points.
You can use the Move Up and Move Down buttons to move the selected Island
order. Of course the number of the islands must be the same for each side.
Synchro Points are a list
of coupled points on the contour (one for each side) that will be used to keep
the hot wire movement synchronized . Each couple will be touched
by the hot wire at the same time. They can be defined by the user or
automatically generated by DevFoam Pro.
A special Synchro Point is the Main Synchro Point, displayed as Green and
flagged with the M letter in the graphic view. The main Syncro Point is the
first one to be adjusted. You cannot delete it, bust just move it using the
'Move the Main Synchro Point' option of the 'Mouse Action on active Side'
panel. After you selected this option just click the new placement of the Main
Synchro Point for the active side. You must take care of the Main Syncro Point
also for each island contour.
When the Main Synchro Points are at the right position, you must take care of
the other Synchro Points. You can try to use the 'Try to Autocreate Synchro
Points' button to create them. Is you are lucky the geometries of the 2 sides
are compatible each other, and the application will do all the work for you.
You can use the '3D Preview' button to check if all is OK.
If the application cannot complete the creation of Synchro Points, you must
create them by hand.
Select the 'Add a New Synchro Point' option of the 'Mouse Action on active
Side' panel and click the contours of each side where you want to place the
Synchro Points. Of course the number Synchro Points must be the same for each
contour in both Sides!
You can also delete them using the 'Remove All Synchro points' button or the
'Delete the clicked Synchro Point' option of the 'Mouse Action on active Side'
panel.
The Syncro Points must be placed at strategic positions like matching corners
or matching rounding start/end points (see the picture).
They will be rendered in Yellow and flagged with the listing number. The
listing number is calculated automatically using the distance on the contour
from the green Main Synchro Point. The island's Synchro Points will be
enumerated using the island list index at the beginning.
A Blue Or Red Label will advise you about the right or wrong setting of islands
number and Synchro Points.
When you finished you must use the 'Save' or 'Save As' button to save your
work.
Let's not take a deeper look at each control included in the dialog window
Left/Right side panels
The upper parts of these
panel includes the functions to arrange the islands order. If you have 2 or
more islands (the same number on each side, of course!), you must set the right
matching order to cut them. The islands are labeled with auto-created letters,
and you must use the supplied buttons to move them in the list, or to erase
some of them if the numbers are not the same.
In the middle you can see the buttons to Move, Rotate and Scale each Side,
setting the right values.
The 'Remove All Synchro points' button just remove all regular Synchro Points
from the side. The Main Synchro Point will not be deleted, but you can move it,
see below.
In the bottom side is included a Radio button, used to specify the Active side.
The active side is enanched with Green or Cyan color (Left/Right) and is the
one you can modify with the mouse clicking, using the option selected in the
next 'Mouse Action on active Side' panel.
Mouse Action on active Side panel
You can specify here the type of action you will perform on the Active side when you click the mouse:
General settings panel
You can specify here the Z distance between Sides (Faces) and swap them Left <-> Right
Graphic view customization panel
This panel includes some option to customize the rendering of the Graphic view:
Other buttons
