|
|
| Back to Browse Tapered Parts |
 |
|
|
|
Tapered Parts Cutting wizard: Tapered Parts selection and placement
|
|
Tapered Parts Cutting wizard: Tapered Parts selection and
placement
Pro version only
This wizard includes 5 pages:
Using this feature you can Cut 1 or more Tapered parts,
modifying for each of them the number of parts to cut, the Scale, the
orientation angle and swapping them.
You can have access to this wizard by the 'Cut the
selected Tapered Parts' button of the
'Browse Tapered Parts' dialog, or by the button 'Cut' in
c Part management dialog.
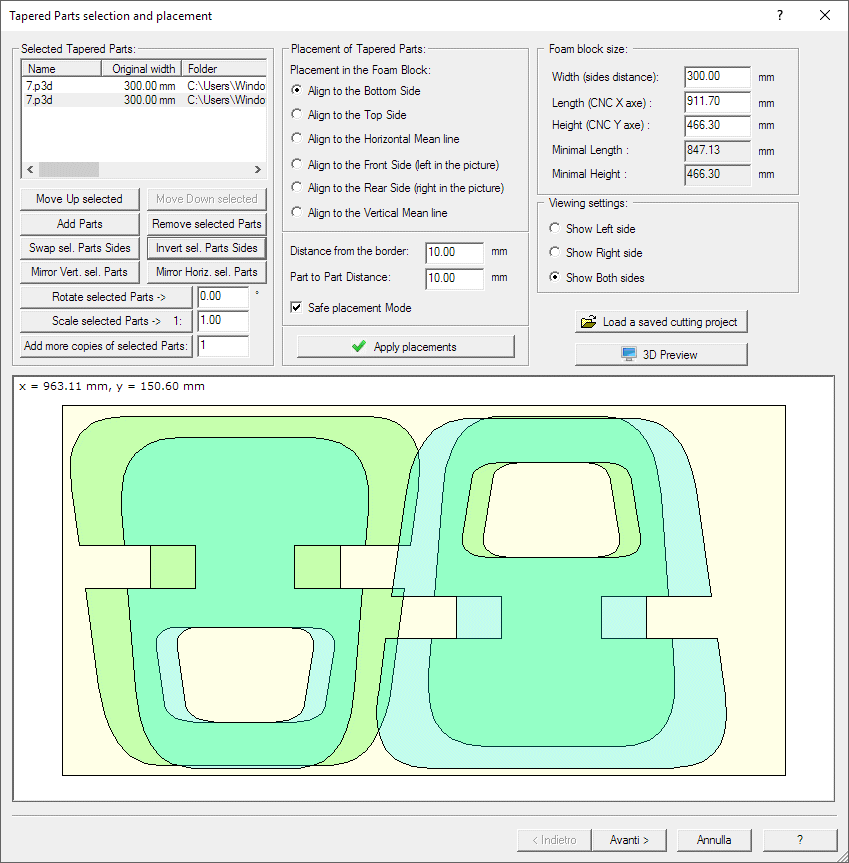
The following dialog will appear:

Let's take a view at each panel of this page:
Selected Tapered Parts
You can specify and resize here the Tapered Parts you are going
to cut.
In the upper side of the panel you can see the list of the actual Tapered Parts.
You can add new Tapered Parts or select 1 (or more) parts and use the following
buttons:
-
Move Up selected - Move up the selected
Tapered part in the list
-
Move Down selected - Move down
the selected Tapered part in the list
-
-
Remove selected Parts - remove the
selected parts from the list
-
Swap sel. Parts Sides - swap the Left
<-> Right sides of the selected Tapered Parts
-
Invert sel. Parts Sides - invert the
Left <-> Right sides of the selected Tapered Parts, the same as Swap + Mirror
Vertical
-
Mirror Vert. sel. Parts - mirror
vertically the selected Tapered Parts
-
Mirror Horiz. sel. Parts - mirror
horizontally the selected Tapered Parts
-
Rotate selected Parts -> value -
rotate the selected Tapered part of the specified value
-
Scale selected Parts -> 1 : value - scale
the selected Tapered part of the specified value
-
Add more copies of selected Parts: N
- add N copies of the selected Tapered Parts
Placement of Tapered Parts
In this folder you can customize the placement of the Tapered
parts in the Foam block.
-
Placement in the Foam Block - you can
select in this Radio button group the alignment type you prefer, as explained
in each button
-
Distance from the border: value - you can
specify here the distance from the foam block borders of the Tapered Parts
-
Part to Part Distance: value - you can
specify here the minimal distance from each Tapered part
-
Safe placement Mode - if you have complex
geometries you can enable this option to be sure they don't interfere each
other. Disabling it you may waste less foam.
-
Apply placements - pressing this button
the placement of the Tapered Parts will be recomputed
Foam block sizes
You can specify here the dimensions of the foam block. They will be
automatically enlarged when you apply new Tapered Parts
-
Width (sides distance): value - specify
the width of the Foam block, the same as the sides distance of the Tapered Parts.
This will be set using the sides distance of the first Tapered part, but you can set
a different value. Applying Tapered Parts with different sides distance will
create parts different from the original one!
-
Length (CNC X axe) : value - the length
of the Foam block, along the X axe of the CNC
-
Height (CNC Y axe) : value -
the height of the Foam block, along the Y axe of the CNC
-
Minimal Length : read only value - the
minimal length of the foam block required by the actual settings
-
Minimal Height : read only value - the
minimal height of the foam block required by the actual settings
Viewing settings
You can selected here which sides you want to display in the
graphic view
Other buttons
-
Load a saved cutting project - you can
load here a saved cutting project. You can save a cutting project using the
'Save as a cutting project' button included in the last page of the Wizard
-
3D Preview - start the application
dev3DView to show you the real 3D shape and placement of the selected Tapered
Parts
When you finished to set the right values press the Next
button to go to Cutting
Path creation page
More info about the picture in this dialog:
-
You can Zoom In/Out using the mouse wheel
-
Clicking a point inside the dialog you go in 'Distance'
mode. When you move the mouse the distance and angle from the clicked point are
displayed in the upper/left side. Clicking again a point the Distance mode will
exit
-
Clicking the right mouse button a contextual menu will be
displayed, showing some more features.
