|
||||
|
Tapered Parts Cutting wizard: Cutting file creation
|
||||
|
||||
|
Tapered Parts Cutting wizard: Cutting file creation
|
||||
Tapered Parts Cutting wizard: Cutting file creation Pro version only
This wizard includes 5 pages:
The following dialog will appear:
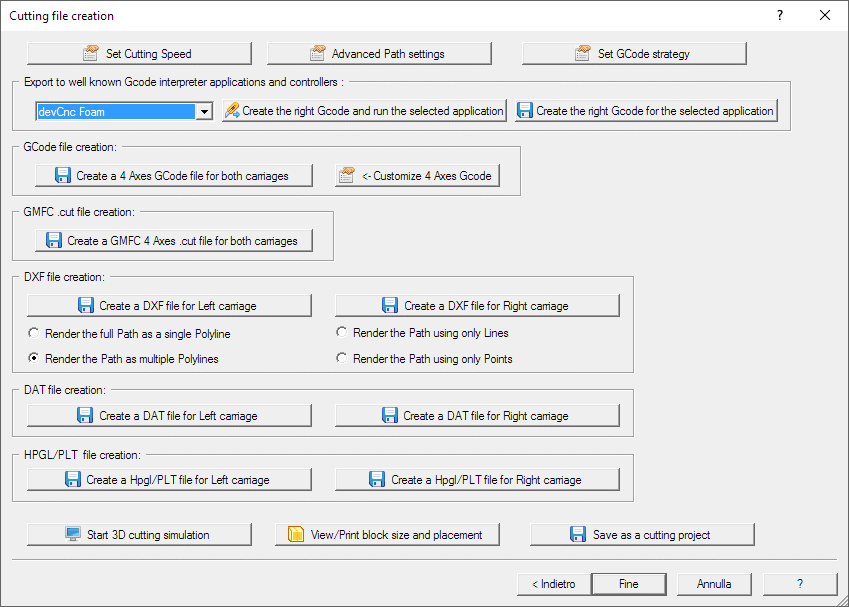
Using this panel you can finally create the cutting files for the Tapered Parts
We are making partnership with Companies supplying good
controllers and the related Gcode interpreter for Foam cutting.
You can select one the approved controller/applications then:
Press the 'Create the right Gcode and run the
selected application' button to create a special GCode file
customized for the selected controller/application and run the application with
the right file already loaded
Press the 'Create the right Gcode for the selected application' button to create a special GCode file customized for the selected controller/application
Or:
Pressing 'Create a 4 Axis GCode file' you will see the
G-code file creation settings for foam cutting 4 axis CNC dialog
where you can customize the GCode sintax. A single file will be created for
both carriages.
Pressing 'Create a GMFC 4 Axis .cut file for both carriages'
you will see the GMFC .cut file creation
dialog where you can set the right parameters to create a .cut file for
GMFC application. A single file will be created for both carriages.
Pressing 'Create a DXF file' will be created a dxf file
You can fine adjust the Cad entities used to render the Cutting path selecting
among:
Pressing 'Create a DAT file' will be created a dat file.
Pressing 'Create a Hpgl/PLT file' will be created
a Hpgl/PLT file.
DXF, DAT and Hpgl files describe a single carriage path, and Left and right
Path will be different as this cut is typically tapered.
So take care to create and use the right and left files. They already have the
same number of vertices/points.
Fast movements are rendered as Green, cutting paths as Red
Press the 'Start 3D cutting simulation' button to run the devFusSim4 application that show a 3D simulation of the cutting Job.
The 'View/Print block size and placement' button will create and open a printable Html file reporting the materail size and placement.
You can save the current Cutting project, and reload it then using the Load a saved cutting project button included in Browse Tapered Parts
Once you exported the Cutting path you can press the 'Finish' button to close the Wizard
